Image generation
Home / Blog / How to Create Handbag Detail Images That Show Leather Texture
How to Create Handbag Detail Images That Show Leather Texture
A practical workflow for creating handbag detail images that show leather grain, stitching, zipper teeth, edge paint, and hardware without changing the bag.
AI handbag detail images that show leather texture work when the buyer can inspect the material, stitching, zipper, edge paint, and hardware without wondering whether the bag changed. The point of a detail image is not to make the product look more expensive than it is. The point is to make the real selling details easier to see.
For leather bags, the best workflow is to lock the full handbag first, then create one close-up detail image from the same product truth. Leather texture product photos only help buyers when the grain, stitch spacing, zipper pull, strap anchor, hardware color, and bag proportions still match the real item. In KrafLayer, use the handbag reference as the source, generate a main image and a detail image separately, and review whether those facts still match.
Why Leather Detail Images Matter
Handbag shoppers use detail images to judge quality. A main image tells them the shape and style. A detail image tells them whether the leather looks smooth, pebbled, waxed, soft, structured, coated, or handmade.
A useful handbag detail image should prove five things:
- The leather grain matches the main product view.
- The stitching is straight, evenly spaced, and in the right place.
- The zipper teeth and pull look physically attached to the same bag.
- The edge paint, piping, strap anchor, and seams follow the real construction.
- The hardware finish stays consistent across the main image and detail crop.
If the detail image shows beautiful texture but changes the zipper, strap connector, or panel layout, it is not a trustworthy ecommerce asset.
Start With A Product-Truth List
Before using an AI product image generator, write down the bag facts that cannot change. This list is more useful than a vague prompt such as "make a premium leather detail shot."
For a leather handbag, lock these facts:
- Bag silhouette, height-to-width ratio, and bottom shape.
- Leather color, grain size, and finish.
- Front panel shape, pocket seam, and stitch paths.
- Zipper color, tooth size, pull shape, and opening position.
- Strap width, anchor rings, buckle, and side tabs.
- Hardware material, color, and reflectivity.
- Edge paint or piping color.
- Brand mark or label placement, if the product has one.
The product-truth list gives the model less room to invent a better-looking but different SKU.
Build The Main Image Before The Detail Crop
Create the main image first. It should show the whole handbag clearly enough that a buyer can understand shape, scale, strap position, pocket layout, and hardware placement. This main image becomes the reference point for every detail image.
For ecommerce product photography, a good handbag main image is usually a three-quarter view with enough side depth to show construction. Keep the bag large in the frame, use soft light to reveal grain, and avoid props that cover the straps or zipper.
After the main image is accurate, create the detail image. Do not ask the AI to invent a random macro shot. Ask for a close crop of the same bag area: zipper corner, side ring, strap anchor, front panel stitch, edge paint, or leather grain near the pocket seam.
The practical rule is simple: the detail crop must make one product fact easier to inspect.
Prompt Pattern For Handbag Leather Texture
Use a prompt that protects construction first, then describes the texture goal.
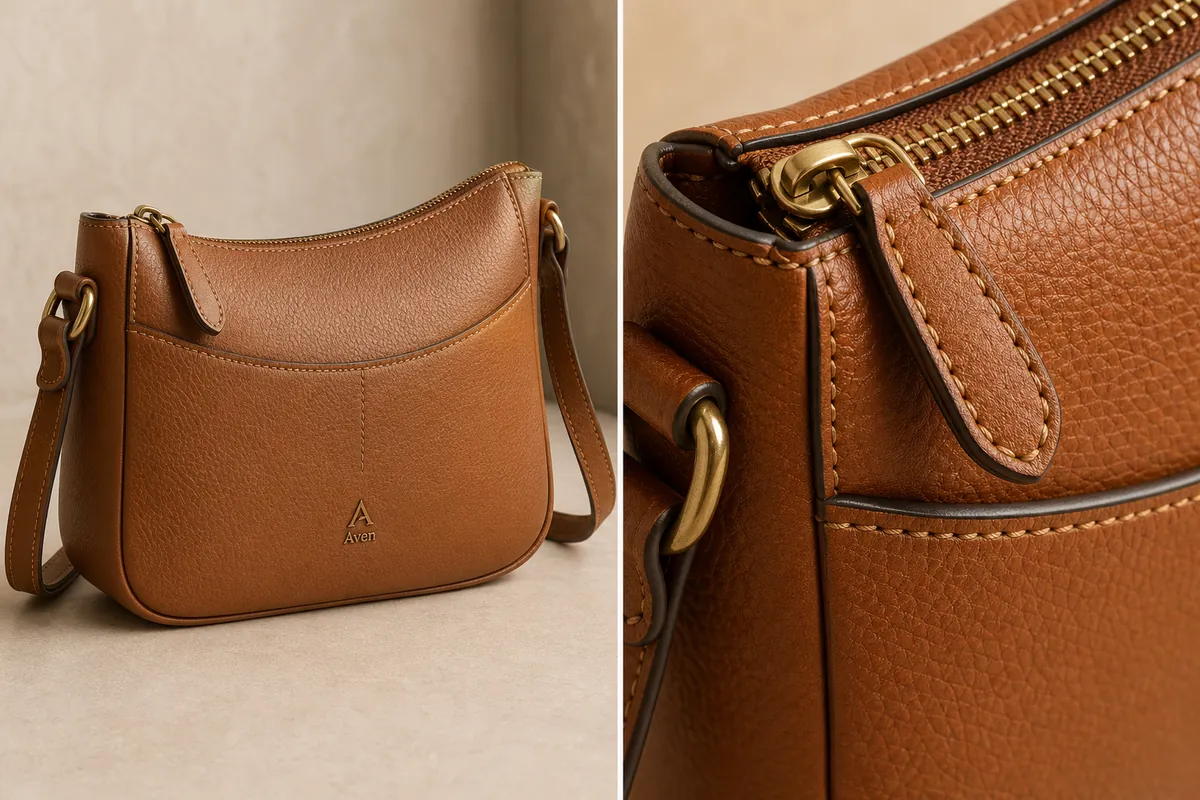
Generate an ecommerce handbag product image from this reference. Preserve the same tan leather crossbody bag, curved top opening, front panel seam, zipper teeth, zipper pull, strap anchor rings, brass hardware, stitch spacing, edge paint, leather grain, product scale, and natural contact shadow. Create a clean main product view with visible pebbled leather texture and believable soft studio light. Do not change the bag shape, add extra pockets, alter the strap, redesign the hardware, imitate a real brand, add badges, add barcodes, add QR codes, or hide the construction details.
For the detail image, narrow the request:
Create a close handbag detail image of the same bag. Focus on the zipper corner, pebbled leather grain, stitch line, edge paint, and brass ring hardware. Preserve the same leather color, grain scale, zipper pull, hardware finish, strap connection, panel seam, and lighting direction. Make the texture clear enough for an ecommerce detail page without turning it into a different handbag.
The second prompt should feel smaller, not more dramatic. Detail images sell trust by being specific.
What To Check In The Generated Detail Image
Look at the detail crop before you publish it. Texture can look convincing at first glance while the construction quietly changes.
Check for:
- Leather grain that becomes too large, plastic, cracked, or inconsistent with the main image.
- Stitching that changes color, spacing, or direction.
- Zipper teeth that float above the leather or become different sizes.
- A zipper pull that changes shape between the main and detail image.
- Hardware that shifts from brass to gold, bronze, or black.
- Edge paint that appears only in the detail crop but not on the real bag.
- A strap anchor that moves to a new panel.
- A logo or label that becomes a fake real-world brand mark.
If the main image is strong but one small area is wrong, use a product photo editor workflow for local correction instead of regenerating the whole composition.
Use Detail Images For Buyer Questions
Each detail image should answer a buyer question. Do not make three close-ups that all say "premium leather."
Use one close-up for each message:
- Leather grain: shows material finish and texture.
- Stitching: shows construction quality.
- Zipper and pull: shows closure durability.
- Strap anchor: shows carrying strength.
- Edge paint or piping: shows finishing detail.
- Interior opening: shows usability when the product reference supports it.
This is where ecommerce product photography becomes more than decoration. A detail image should reduce uncertainty about the product, especially for tactile categories like bags, shoes, apparel, and accessories.
A Practical Handbag Detail Workflow
1. Upload the clearest handbag reference you have. 2. Generate a clean main image that preserves the bag shape, panel layout, strap, and hardware. 3. Review the main image for product truth before making any detail crops. 4. Choose one selling detail: leather grain, zipper, stitching, hardware, strap anchor, or edge finish. 5. Generate a close detail image of that exact area. 6. Compare the main image and detail crop side by side. 7. Fix small local issues, then export the final WebP or platform-ready product image.
Do not skip step six. The side-by-side review is where most AI detail-image problems become obvious.
FAQ
How do I create AI handbag detail images that show leather texture?
Start with a clear product reference, lock the handbag facts, and generate the main image before the detail crop. Then request a close view of one area, such as the zipper corner or front seam. Review leather grain, stitching, hardware, strap anchor, and zipper shape before publishing.
What should a handbag detail image show?
A handbag detail image should show one useful selling fact: leather grain, stitch quality, zipper teeth, edge paint, hardware finish, strap construction, or pocket detail. It should not be a random macro texture that could belong to any bag.
Can AI make leather look more premium?
AI can improve lighting, crop, and texture visibility, but it should not misrepresent the product. If the original handbag has subtle grain, the detail image should make that grain easier to see, not turn it into a different leather finish or higher-tier material.
Why do AI handbag images often change the hardware?
Small metal parts are easy for image models to reinterpret because they combine reflections, geometry, and tiny repeated shapes. Protect hardware in the prompt by naming the exact ring, buckle, zipper pull, tooth size, color, finish, and position.
Should I use one image or multiple detail images on a product page?
Use enough detail images to answer real buyer questions, but keep each one focused. For many handbags, one main image plus two or three detail images covering leather grain, zipper/hardware, and strap construction is more useful than a large gallery of similar beauty shots.
Conclusion
Handbag detail images work best when they turn texture and construction into visible product proof. KrafLayer helps sellers create AI product images from a handbag reference, then produce main images and leather-detail views that keep grain, stitching, zipper, hardware, edge paint, and scale connected to the same SKU. For fashion ecommerce teams, the advantage is faster product imagery that still gives buyers concrete material and construction details to inspect.
Related articles
Image generation · 6 min read
How to Create Product Benefit Images With Close-Up Callouts
A practical workflow for creating ecommerce product benefit images with accurate close-up callouts, short labels, and product-truth review.
Image generation · 6 min read
How to Create Watch Product Images Without Losing Dial Details
A practical workflow for creating watch product images that preserve dial markers, hands, subdials, crown, case, strap stitching, and finish.
Image generation · 6 min read
How to Generate Perfume Product Photos That Show Glass Texture
A practical workflow for generating perfume product images that show transparent glass, liquid depth, cap texture, and controlled reflections without changing the SKU.
Image generation · 7 min read
AI Product Photo Generator From Reference Image: A Practical Workflow
A practical workflow for using one reference image to generate ecommerce main, detail, and campaign product photos without changing the SKU.
Image generation · 7 min read
AI Product Photography vs Traditional Product Photography
A practical comparison of AI product photography and traditional studio photography for ecommerce teams deciding what to shoot, generate, and review.
Image generation · 8 min read
Best AI Product Image Generator for Ecommerce Product Photos
A practical buyer's guide for choosing an AI product image generator that preserves product details and produces ecommerce-ready image sets.
Related KrafLayer tools
- AI product image tools — Browse the full tool list for ecommerce image editing and product visual workflows.
- Ecommerce product photography — Plan listing images, lifestyle scenes, detail shots, and store-ready ecommerce product photos.
- Listing main and detail images — Generate ecommerce listing main images and detail-page product visuals from product references.
- On-model product photos — Create product-on-model and lifestyle visuals when human context helps the product sell.
- Marketplace product images — Choose product image workflows for Shopify, Amazon, Etsy, Walmart, WooCommerce, and other selling channels.
- Product category image styles — Browse category-specific product image pages for beauty, jewelry, fashion, furniture, tech, food, and more.
- Product photo editor — Clean, retouch, upscale, restore, outpaint, and repair product photos before publishing.
- Reference-style product images — Generate ecommerce product images from competitor, brand, or campaign reference styles while preserving your own product identity.
- AI background remover — Create clean transparent product cutouts for listings, ads, and layout work.
- AI object eraser — Remove props, text, clutter, or distractions from product images.
- AI image upscaler — Increase product image resolution for listings, ads, and detail-page assets.
- AI image restoration — Refresh damaged, low-quality, or older product photos before reuse.
- AI background replacer — Move a product into a cleaner studio, lifestyle, or campaign background.
- AI mask edit — Edit selected regions while keeping the rest of the product image stable.
- AI reference image editor — Use extra references to guide product identity, material, style, or composition changes.
- AI scene compose — Place products into controlled commercial scenes without losing product clarity.