Edit tools
Online Product Photo Editor: 8-Step Ecommerce Workflow
TL;DR
Use an online product photo editor with a reversible workflow for cleanup, cutouts, local fixes, upscaling, scene creation, and channel exports.
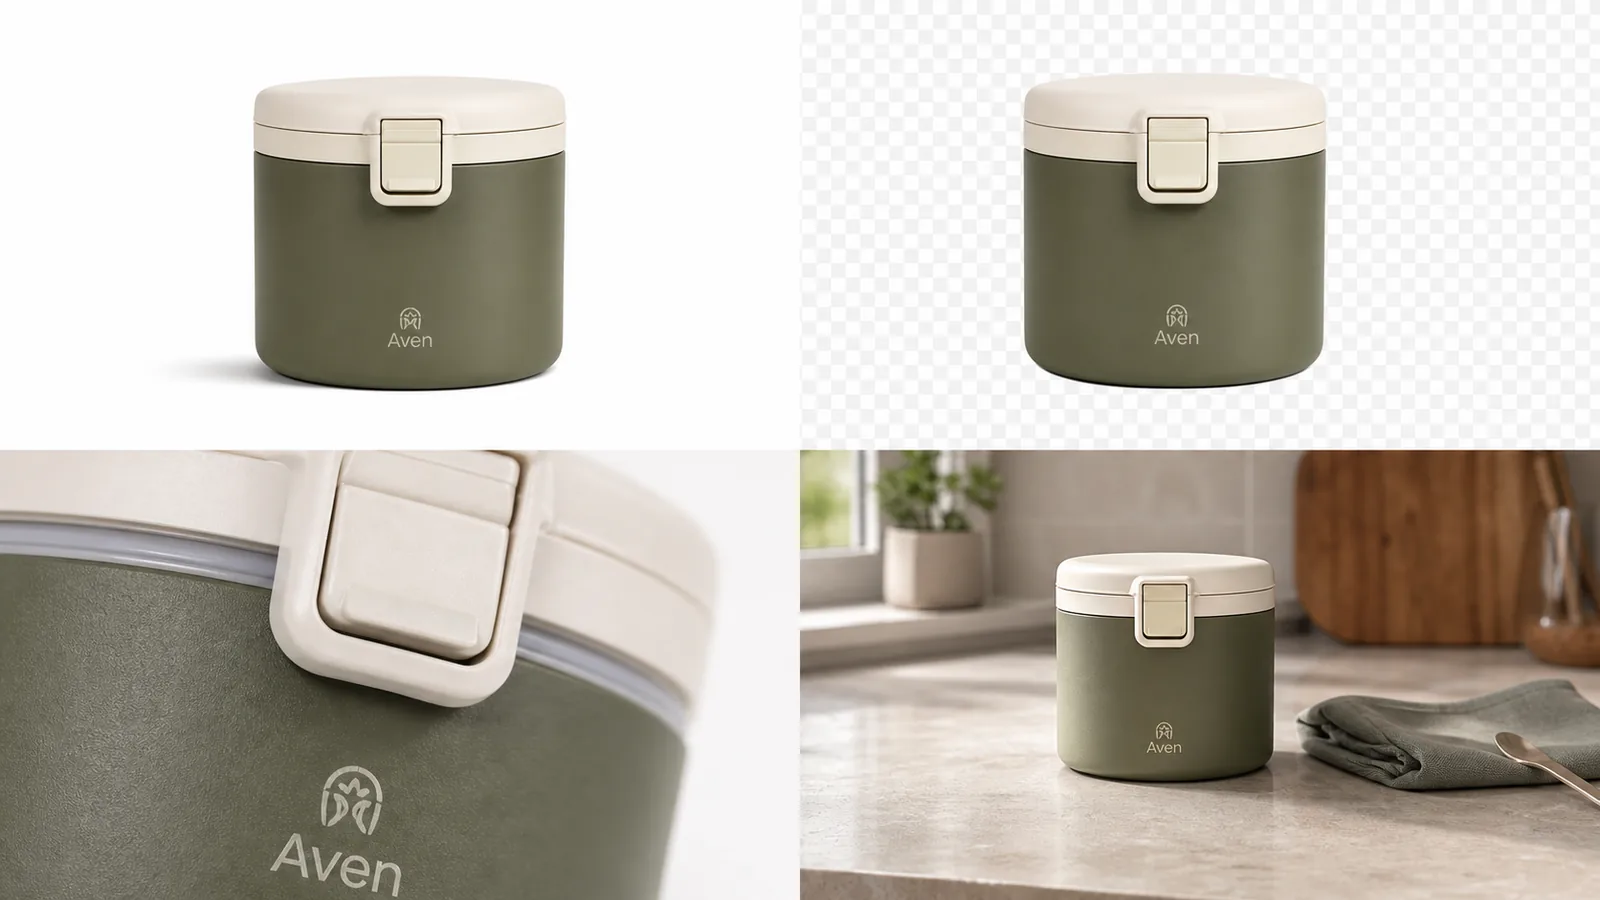
An online product photo editor should behave like a production line, not a slot machine. Diagnose the visible defect, make the smallest edit that fixes it, compare the result with the original, then export a channel-specific copy. Background removal, object cleanup, upscaling, and scene generation are different operations and should not be bundled into one blind prompt.
The workflow uses current Google, Shopify, Etsy, and eBay image guidance checked on August 11, 2026. The lunchbox grid is a KrafLayer demonstration asset, not a customer case study or a timed productivity test.
Quick Summary
Google recommends product fill of 75%–90% and images around 1500 × 1500 pixels or larger. Shopify says 2048 × 2048 usually displays best for square product images. Keep an untouched master, edit in a deliberate order, and create separate exports for each channel.
Abstract
The safest browser workflow is source intake, defect diagnosis, background or object cleanup, local correction, optional upscale, channel crop, and full-resolution review. Generate a lifestyle scene only after the factual product asset is clean. Preserve each useful stage so one bad edit does not contaminate the entire chain.
Key Takeaways
- Choose an operation by defect, not by novelty.
- Never overwrite the original source.
- Upscaling cannot recover facts that were never captured.
- Transparent PNG is a master format, not a universal marketplace output.
- Review product fidelity before judging polish.
Table of Contents
1. [Scope and method](#what-should-an-online-product-photo-editor-do) 2. [Defect-to-tool map](#which-edit-should-you-use-first) 3. [Eight-step workflow](#what-is-a-reliable-browser-editing-workflow) 4. [File and export rules](#how-should-you-manage-files-and-exports) 5. [Fidelity review](#what-should-you-check-at-full-resolution) 6. [Channel targets](#how-do-channel-requirements-change-the-export) 7. [When to reshoot](#when-is-editing-the-wrong-fix) 8. [Frequently asked questions](#frequently-asked-questions)
What Should an Online Product Photo Editor Do?
Google's product-image guidance requires accurate product representation, correct variants, and no promotional overlays in the primary feed image. That means a useful editor must do more than produce an attractive result: it must support a reviewable path from source to compliant export ([Google Merchant Center](https://support.google.com/merchants/answer/6324350?hl=en), 2026).
We evaluated the workflow by reversibility, product-fidelity risk, and channel readiness. We did not compare processing speed or output quality across paid competitors. The focus here is operational: what sequence reduces avoidable damage when a seller edits real catalog files in a browser?
*KrafLayer demonstration composite. The four panels represent separate deliverables, not four filters: factual main view, reusable cutout, detail evidence, and lifestyle context.*
Which Edit Should You Use First?
Google explicitly mentions increasing resolution, removing backgrounds, and generating scenes as separate Product Studio operations. Treating them separately makes the result easier to inspect and undo ([Google Merchant Center](https://support.google.com/merchants/answer/6324350?hl=en), 2026).
| Visible defect | First operation | Review risk | Avoid when |
|---|---|---|---|
| Messy background | Background remover | Clipped edges and halos | Product is also damaged or badly blurred |
| Dust, cable, prop, spot | Object eraser | Invented fill touching the SKU | Object hides a factual product feature |
| One glare or local blemish | Masked/local edit | Boundary mismatch | Whole image needs relighting |
| Small but sharp source | Upscaler | Invented text and texture | Original label is unreadable |
| Correct item, wrong scene | Background replacer | Light, scale, reflection, contact | Main image must remain plain |
| Missing campaign composition | Reference or scene editor | Product drift | No reliable product source exists |
Do cleanup before generation. A clean cutout is reusable; a fully generated lifestyle image is a branch, not a new master.
What Is a Reliable Browser Editing Workflow?
Shopify accepts product images up to 5000 × 5000 pixels or 25 megapixels, under 20 MB, and says 2048 × 2048 usually displays best for square images. Those limits support a master-and-export workflow rather than repeated editing of already compressed listing files ([Shopify Help Center](https://help.shopify.com/en/manual/products/product-media/product-media-types), 2026).
1. Save the source unchanged. Use the largest original capture, not a downloaded marketplace thumbnail. 2. Name the defect. Write one sentence: “Remove the gray sweep without changing the transparent handle.” 3. Choose one operation. Use the [background remover](/tools/ai-background-remover), [object eraser](/tools/ai-object-eraser), [upscaler](/tools/ai-image-upscaler), or [background replacer](/tools/ai-background-replacer) that matches it. 4. Inspect the first output at 100%. Check silhouette, text, material, and components before more edits. 5. Save a clean intermediate. Keep the transparent cutout or corrected master. 6. Create role-specific branches. White main image, detail crop, and lifestyle image should be separate files. 7. Crop and resize for the destination. Do not make every channel consume one compromised export. 8. Run a final side-by-side review. Source on the left, export on the right, same zoom.
Start with the defect you can point to
Open the [KrafLayer Product Photo Editor](/product-photo-editor), choose one editing route, and keep the original visible during review. A smaller first edit is easier to trust and easier to undo.
How Should You Manage Files and Exports?
Etsy recommends listing images at least 2000 pixels wide and high, while eBay requires at least 500 × 500 and recommends about 1600 × 1600. A single “final.jpg” cannot document which channel, crop, or revision it represents ([Etsy Help](https://help.etsy.com/hc/en-us/articles/115015663347-Requirements-and-Best-Practices-for-Images-in-Your-Etsy-Shop); [eBay Help](https://www.ebay.com/help/selling/listings/adding-pictures-listings?id=4148), 2026).
Use filenames that expose the chain:
`sku-angle-role-channel-size-version.ext`
For example: `KL-104-front-main-google-1500-v03.jpg`. Keep the source, transparent master, edited master, and channel exports in separate folders or status fields. The naming work prevents a low-resolution export from becoming next month's source.
| File stage | Preferred purpose | Do not use as |
|---|---|---|
| Original capture | Factual archive | Public file if it still contains setup clutter |
| Transparent master | Recomposition and layout | Etsy upload without flattening |
| Corrected master | High-resolution editing base | Permanent overwrite of the original |
| Channel export | Upload-ready crop and compression | Future generation reference if a better master exists |
What Should You Check at Full Resolution?
Google requires the correct color, pattern, and material for each variant. Full-resolution review should therefore focus on product facts, while normal-size review handles composition and thumbnail review handles hierarchy ([Google Merchant Center](https://support.google.com/merchants/answer/6324350?hl=en), 2026).
- Silhouette: no missing straps, handles, corners, fibers, or transparent edges.
- Text: labels, warnings, logos, and numbers match the source exactly.
- Material: grain, weave, gloss, glass, and metal remain physically credible.
- Components: caps, ports, seams, fasteners, and included items do not multiply or vanish.
- Color: the correct variant survives white balance and background spill.
- Contact: shadow and reflection make sense in the final scene.
- Crop: nothing important is clipped, and product fill fits the channel.
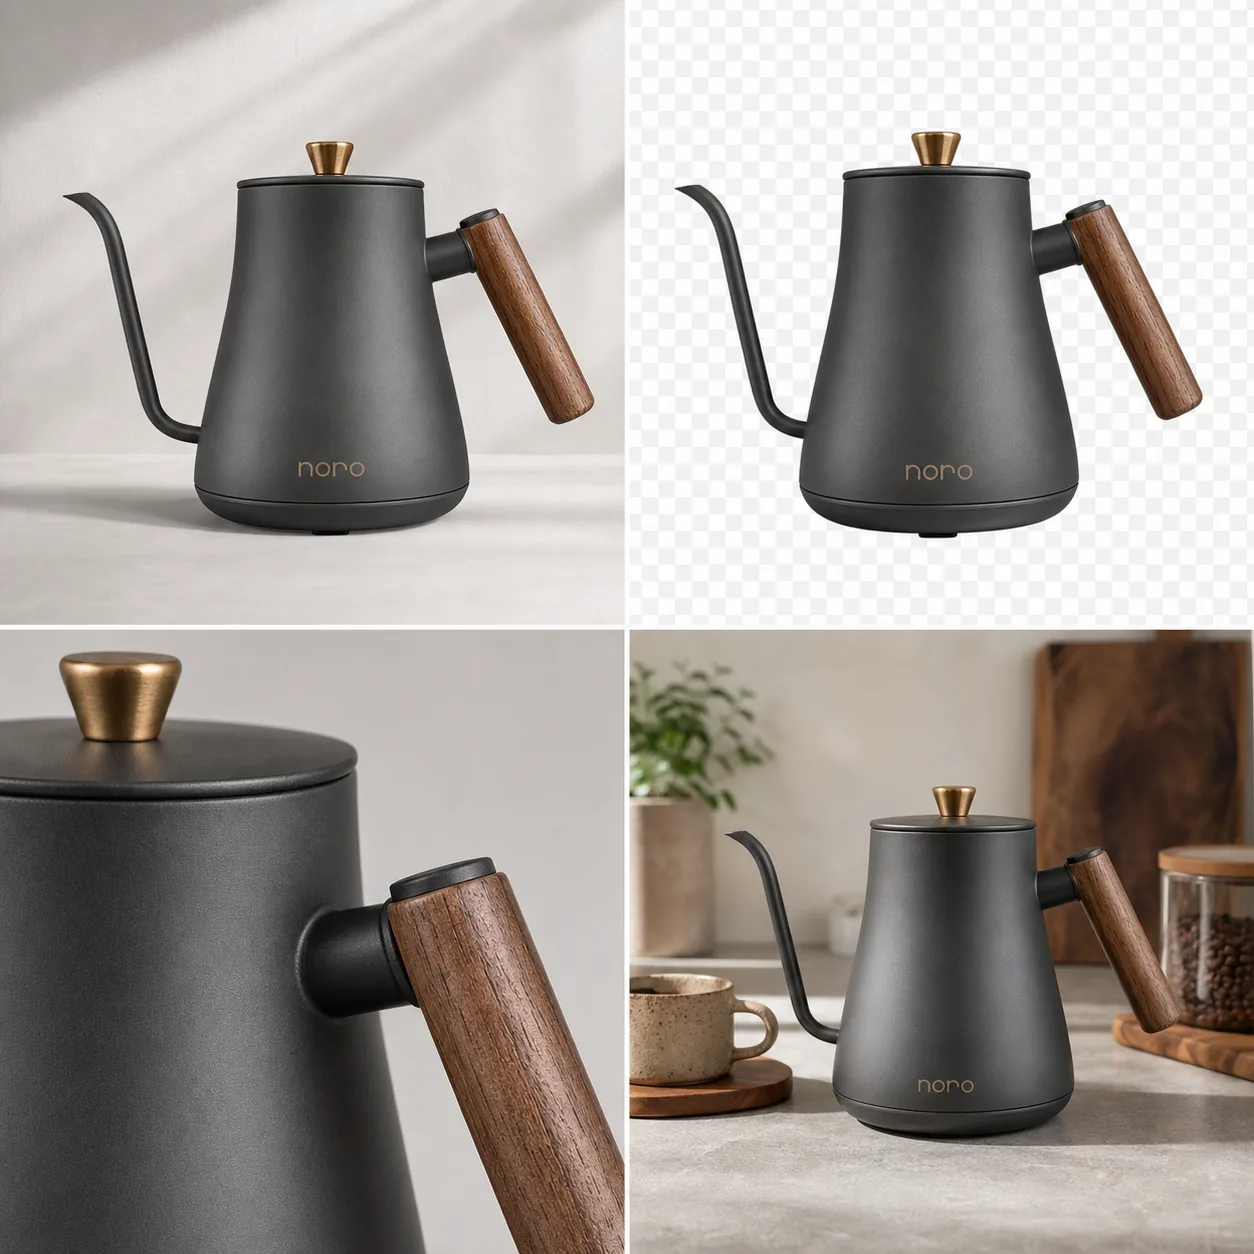
*Published demonstration. Thin geometry such as the spout, lid, handle attachment, and front mark reveals edit damage earlier than the background does.*
How Do Channel Requirements Change the Export?
Google recommends around 1500 × 1500 or larger and will require a 500 × 500 minimum from January 31, 2027. Shopify usually recommends 2048 × 2048 for square product images. Etsy recommends 2000 pixels in both dimensions and turns transparency black ([Google](https://support.google.com/merchants/answer/6324350?hl=en); [Shopify](https://help.shopify.com/en/manual/products/product-media/product-media-types); [Etsy](https://help.etsy.com/hc/en-us/articles/115015663347-Requirements-and-Best-Practices-for-Images-in-Your-Etsy-Shop), 2026).
| Destination | Practical starting export | Special check |
|---|---|---|
| Google Merchant Center | 1500 × 1500 or larger when source allows | 75%–90% product fill, no overlays |
| Shopify | 2048 × 2048 square for common catalog use | Consistent aspect ratios across collection |
| Etsy | At least 2000 × 2000 | Flatten transparency and protect first-image crop |
| eBay | Around 1600 × 1600 | Neutral background, multiple angles, honest flaws |
These are working targets derived from platform help pages, not guarantees for every category. Check current category-specific policy before a bulk upload.
When Is Editing the Wrong Fix?
Editing is the wrong fix when the source lacks evidence. Reshoot an unreadable label, a hidden connector, a cropped silhouette, uncontrolled motion blur, false variant color, or glare that covers the construction. An upscaler can invent plausible texture, but plausible detail is not factual detail.
Also reshoot when the seller needs a new angle. A front photograph cannot reliably establish the back, depth, or underside. Reference generation is useful for concepts and secondary scenes, but a factual marketplace view should come from a source that actually shows the product.
Verdict
An online editor becomes reliable when every edit has a named defect, an untouched source, and a review checkpoint. Keep the transparent or corrected master separate from channel exports. Generate new scenes only as branches after the factual product asset is clean.
Frequently Asked Questions
What is an online product photo editor?
It is a browser-based tool for tasks such as background removal, object cleanup, local correction, upscaling, and scene replacement. For ecommerce, its value depends on whether the output preserves the exact SKU and can be exported to the target channel's requirements.
Which product photo edit should I do first?
Start with the narrowest operation that fixes the visible defect. Remove a background before generating a scene, erase one distraction before relighting the whole photo, and restore or reshoot a weak source before upscaling it. Save a clean intermediate after each useful stage.
Can a browser editor replace Photoshop for ecommerce?
It can handle many repeatable catalog jobs, especially cutouts, cleanup, resizing, and simple scene replacement. Complex transparent materials, regulated labels, difficult reflections, precise compositing, and pixel-level retouching may still need manual tools or a reshoot.
Should I export transparent PNG or white JPEG?
Keep a transparent PNG as the reusable master when the cutout is clean. Export a flattened white or channel-specific file for publishing. Etsy turns transparency black, so a transparent upload can look very different from the editor preview.
Can AI upscaling make a small product image accurate?
It can improve apparent resolution, but it cannot verify hidden or unreadable facts. If the source does not show label text, weave, serial number, or product edges clearly, find a better source or reshoot. Never treat generated detail as product documentation.
References
1. [Google Merchant Center: Image link requirements](https://support.google.com/merchants/answer/6324350?hl=en), accessed August 11, 2026. 2. [Shopify Help Center: Product media types](https://help.shopify.com/en/manual/products/product-media/product-media-types), accessed August 11, 2026. 3. [Etsy Help: Image requirements and best practices](https://help.etsy.com/hc/en-us/articles/115015663347-Requirements-and-Best-Practices-for-Images-in-Your-Etsy-Shop), accessed August 11, 2026. 4. [eBay Help: Adding pictures to listings](https://www.ebay.com/help/selling/listings/adding-pictures-listings?id=4148), accessed August 11, 2026.
Keep exploring
Continue the story
More practical guidance on product accuracy, composition, and conversion-ready visuals.
Put it into practice
Take the next step in KrafLayer
Choose a generation or editing workflow that matches what you just learned.