Ecommerce
Home / Blog / How to Create Perfume Product Photos Without a Studio
How to Create Perfume Product Photos Without a Studio
A practical workflow for creating perfume main images and detail images without a studio while preserving glass, liquid, cap, label, and reflection details.
Perfume product photos without a studio work best when you keep the bottle facts fixed and use AI to control the things a studio normally controls: background, crop, light direction, reflection, and image role. A good perfume product photography workflow is not about making a fantasy fragrance ad. The goal is to create a main image and detail image that help a buyer understand the glass, liquid, cap, label, and scale of the real product.
The practical rule is this: make the perfume bottle easy to inspect first, then add mood only where it supports the sale. In KrafLayer, that means using a product reference, generating one ecommerce image role at a time, and checking glass edges, liquid color, label placement, cap shape, and reflection behavior before publishing.
Start With The Product Facts, Not The Mood
Perfume is easy to over-style. A warm reflection, a marble surface, or a soft shadow can make the image feel premium, but those details do not matter if the AI changes the bottle shape or makes the label unreadable.
Before generating images, write a short product-truth list:
- Bottle shape and height-to-width proportion.
- Glass thickness, corner radius, and base weight.
- Liquid color and fill level.
- Cap material, color, height, and position.
- Label size, placement, typography style, and text hierarchy.
- Spray tube, collar, or atomizer details if they are visible.
- Any real packaging facts the buyer will see after purchase.
This list keeps the image grounded. Without it, the output may look polished but drift away from the actual SKU.
Main Image Comes Before Campaign Creative
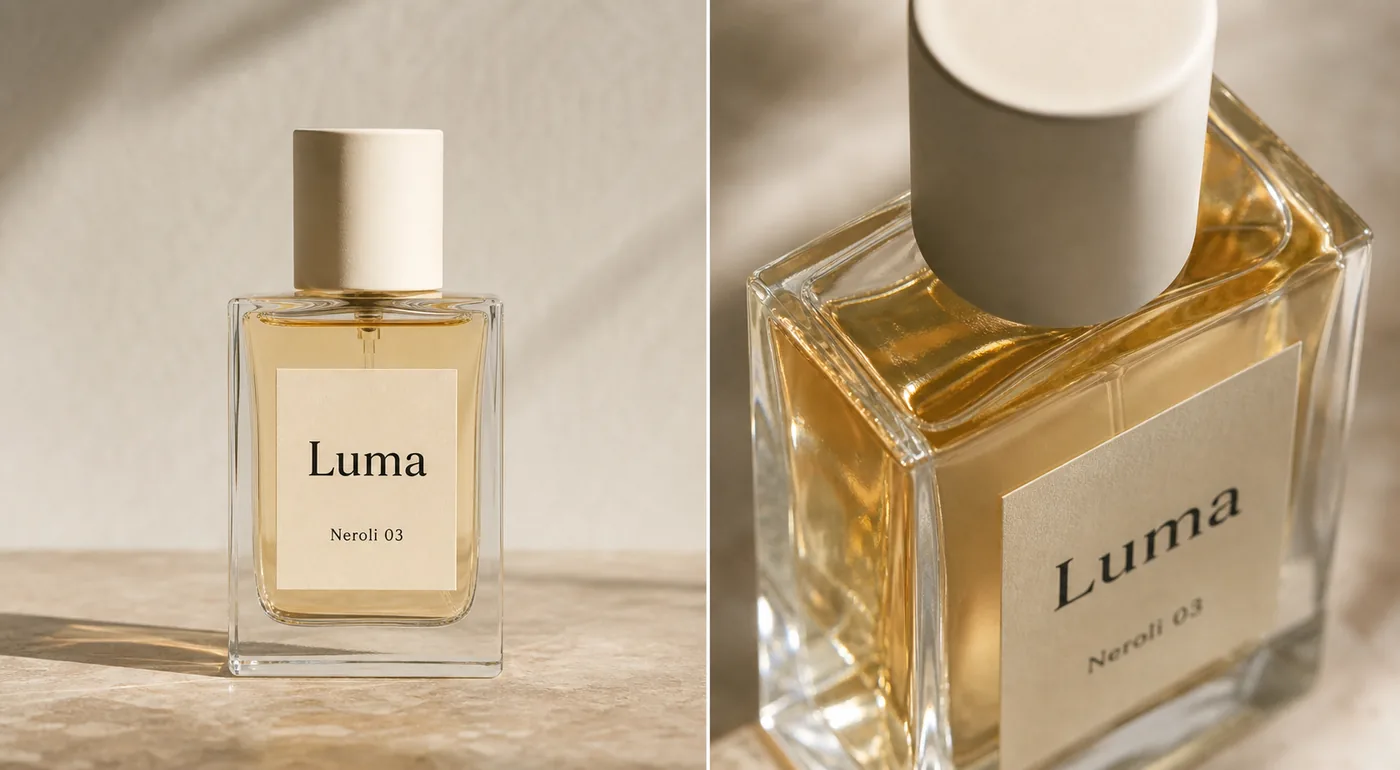
A main perfume image should answer the buyer's first question: what exactly is the bottle? Keep the bottle large, upright, and readable. Use a clean warm neutral, white, light gray, or softly textured surface only if it does not distract from the label and glass edges.
For ecommerce product photography, the main image should usually be calmer than an ad image. It needs enough light to show the liquid and glass, enough shadow to ground the bottle, and enough contrast to separate transparent edges from the background.
Do not ask AI for "luxury perfume ad" as the first output. That often creates dramatic props, fake labels, impossible reflections, and a bottle that looks like a different product. Start with the main image, review it, then create supporting visuals.
Detail Images Should Prove One Selling Point
A detail image is not a second hero. It should show one buyer-relevant feature: glass thickness, liquid tone, cap texture, label paper, spray collar, bottle base, gift-box finish, or product scale.
For a perfume bottle, useful detail images often include:
- A close crop of the glass shoulder and liquid line.
- A cap texture shot that shows matte, metal, wood, ceramic, or plastic finish.
- A label close-up that confirms paper texture and placement.
- A side-angle image that shows bottle depth.
- A soft reflection image that makes the transparent glass readable.
Keep the detail image tied to the same SKU. If the liquid becomes darker, the cap changes material, or the label moves, the image stops supporting buyer trust.
KrafLayer Workflow For Perfume Images
Use KrafLayer one image role at a time.
First, create the main product image with the AI product image generator. Use the perfume bottle reference and specify the protected facts: bottle geometry, glass thickness, liquid color, fill level, cap shape, label placement, and readable label area.
Second, make the detail view. Ask for a closer crop that emphasizes one material cue, such as transparent glass and amber liquid. Do not request multiple selling points in one detail image.
Third, use the product photo editor for small corrections. If a reflection crosses the label, the cap edge looks soft, or the background has a distracting mark, fix that local issue instead of regenerating the entire image.
This workflow is slower than pressing generate once, but it prevents the most common perfume-image problem: the photo looks beautiful while the product quietly changes.
Prompt Pattern For No-Studio Perfume Photos
Use a prompt that separates protected product facts from the desired image role.
Create a clean ecommerce main image for this perfume bottle. Preserve the exact rectangular glass bottle shape, transparent glass thickness, pale amber liquid color, fill level, cream cylindrical cap, centered label size, label placement, simple typography style, spray tube position, product scale, and realistic contact shadow. Use soft natural light, controlled reflections, and a warm neutral product-photography background. Make the bottle readable on mobile. Do not redesign the bottle, change the cap, invent extra labels, add badges, add barcodes, imitate a real brand, or create unrealistic glass reflections.
For a detail image, narrow the instruction:
Create a close perfume detail image that shows the same bottle's glass thickness, amber liquid, cap texture, and label paper. Keep the same SKU, same cap, same liquid color, same label placement, and same glass geometry. Use controlled reflection and shallow depth of field, but keep the product facts believable.
Reflection Rules That Keep The Bottle Real
Perfume needs reflection, but not every reflection helps.
Use reflection to define glass edges, show liquid depth, and separate the bottle from the background. Avoid reflection that covers the label, makes the liquid look like a different shade, hides the spray tube, or creates extra bottle edges that do not exist.
If the AI output makes the glass look expensive but unclear, reduce the effect. A buyer should not need to guess where the bottle ends, where the liquid starts, or whether the label is printed on paper, glass, or a box.
Review Checklist Before Publishing
Check the final image against the product reference:
- Is the bottle still the same shape and proportion?
- Did the liquid color and fill level stay consistent?
- Is the cap material believable and unchanged?
- Are the label size, placement, and hierarchy still accurate?
- Do glass edges, base thickness, and corners make physical sense?
- Are reflections controlled rather than covering the product?
- Is the image useful as a main image, detail image, or campaign asset?
- Are there fake logos, real-brand lookalikes, barcodes, QR codes, badges, certification marks, or unsupported claims?
If the image fails one product-fact check, make a smaller edit. A clean no-studio workflow should make the perfume easier to sell, not harder to verify.
FAQ
Can I create perfume product photos without a studio?
Yes. You can create perfume product photos without a studio when you have a clear product reference and review the output against the real bottle. Use AI for background, lighting, crop, reflection control, and detail-image composition, but protect bottle geometry, label placement, cap shape, liquid color, and glass behavior.
What is the best first image to make for a perfume listing?
Start with a clean main image. The bottle should be upright, large enough to inspect on mobile, and readable without heavy props. Once the main image is accurate, create detail images for glass thickness, liquid tone, cap texture, label paper, or packaging material.
How do I keep AI from changing the perfume bottle?
Write a product-truth list before generating. Include bottle shape, glass thickness, liquid color, fill level, cap shape, label placement, typography style, spray tube, scale, and shadow. Put those protected facts in the prompt and compare every output to the source reference before publishing.
Should perfume product images have strong reflections?
Use enough reflection to show glass, liquid depth, and premium material, but keep it controlled. Reflections should not cover the label, change the liquid color, create impossible edges, or make the bottle harder to inspect. Clear product truth matters more than dramatic shine.
When should I use editing instead of generating a new perfume image?
Use editing when the bottle identity is already correct and only a local problem needs repair, such as a distracting reflection, dust spot, background mark, crop issue, or soft cap edge. Regenerate only when the image role is wrong or the whole composition needs to change.
Conclusion
Perfume product photos without a studio are possible when the workflow stays product-first. Build a clean main image, create one detail image that proves material or packaging quality, and review every output against the real bottle. KrafLayer helps with this no-studio workflow by turning product references into ecommerce images while keeping glass, liquid, cap, label, and reflection details central to the result.
Related articles
Ecommerce · 6 min read
How to Turn Phone Product Photos Into Ecommerce Images
A no-studio workflow for turning ordinary phone product photos into cleaner ecommerce images while keeping product color, fabric, shape, and buyer-facing details accurate.
Ecommerce · 6 min read
How to Turn Warehouse Product Photos Into Online Store Images
A practical no-studio workflow for turning rough warehouse product photos into cleaner online store images without changing SKU color, material, shape, or details.
Ecommerce · 7 min read
Common Background Colors for Ecommerce Product Photography
A practical guide to white, gray, warm neutral, muted brand, and dark background colors for ecommerce product photography.
Ecommerce · 8 min read
Ecommerce Product Photography Trends 2026: What Online Stores Actually Need
The 2026 ecommerce product photography trend is not louder imagery. Stores need clearer product identity, faster content production, and image systems that work across listings, PDPs, ads, and marketplace channels.
Ecommerce · 7 min read
White Background vs Lifestyle Background for Product Photos
A practical guide to choosing white-background product photos for clarity and lifestyle backgrounds for ecommerce context.
Ecommerce · 7 min read
How to Create Ecommerce Product Photos Without a Studio
A practical no-studio workflow for turning one product reference into main images, detail images, lifestyle scenes, and ad creatives.
Related KrafLayer tools
- AI product image tools — Browse the full tool list for ecommerce image editing and product visual workflows.
- Ecommerce product photography — Plan listing images, lifestyle scenes, detail shots, and store-ready ecommerce product photos.
- Listing main and detail images — Generate ecommerce listing main images and detail-page product visuals from product references.
- On-model product photos — Create product-on-model and lifestyle visuals when human context helps the product sell.
- Marketplace product images — Choose product image workflows for Shopify, Amazon, Etsy, Walmart, WooCommerce, and other selling channels.
- Product category image styles — Browse category-specific product image pages for beauty, jewelry, fashion, furniture, tech, food, and more.
- Product photo editor — Clean, retouch, upscale, restore, outpaint, and repair product photos before publishing.
- Reference-style product images — Generate ecommerce product images from competitor, brand, or campaign reference styles while preserving your own product identity.
- AI background remover — Create clean transparent product cutouts for listings, ads, and layout work.
- AI object eraser — Remove props, text, clutter, or distractions from product images.
- AI image upscaler — Increase product image resolution for listings, ads, and detail-page assets.
- AI image restoration — Refresh damaged, low-quality, or older product photos before reuse.
- AI background replacer — Move a product into a cleaner studio, lifestyle, or campaign background.
- AI mask edit — Edit selected regions while keeping the rest of the product image stable.
- AI reference image editor — Use extra references to guide product identity, material, style, or composition changes.
- AI scene compose — Place products into controlled commercial scenes without losing product clarity.