Platforms
Home / Blog / Shopify Product Image File Size: Compress Images Without Losing Product Detail
Shopify Product Image File Size: Compress Images Without Losing Product Detail
Learn how to compress Shopify product images while preserving labels, texture, zoom detail, color, and collection-grid clarity.
The right Shopify product image file size is the smallest file that still preserves product facts shoppers need to inspect. Do not chase an arbitrary number if it makes labels soft, fabric texture muddy, metal edges jagged, or color inaccurate. Compress the image, preview it in the actual theme, and check the main image, zoom view, collection crop, and mobile page before publishing.
KrafLayer fits this workflow when the source image needs cleanup first: fix the product photo, preserve the details that affect trust, then export a web-ready image that your Shopify theme can display clearly.
Shopify Product Image File Size Is A Quality Gate
For ecommerce, file size is not only a speed metric. It is a quality gate. A product image can be technically small and still fail the page if the buyer can no longer read the label, inspect the texture, understand scale, or trust the color.
Use this practical rule:
Compress Shopify product images until the page feels lighter, then stop before product evidence disappears.
Product evidence includes:
- silhouette and edge shape
- true color
- material texture
- label position and readable large text
- stitching, caps, buttons, zippers, or hardware
- contact shadow and product scale
- variant differences
The practical Shopify product image size question is not only "how many pixels or bytes?" It is "which product image detail must still be clear after export?" Keep that detail list beside the original file when you compress product images, so the final review is about visible selling evidence rather than guesswork.
That is why one universal file-size threshold is a weak publishing rule. A simple white-background bottle, a textured handbag detail image, and a lifestyle furniture photo do not tolerate compression in the same way.
A Safer Compression Workflow
Start with the product role, not the file tool.
1. Choose the image role: main product image, detail image, lifestyle image, collection thumbnail, or variant image. 2. Export a clean web image from the best available source. 3. Compress a copy, not the master file. 4. Preview the compressed image inside the Shopify theme. 5. Check desktop gallery, mobile gallery, zoom behavior, and collection crop. 6. Compare the compressed image against the original at the details buyers care about. 7. Keep the lighter file only if the product facts still hold.
This keeps Shopify image optimization tied to selling clarity instead of a blind race toward the smallest possible file. In practice, compress product images by role: protect the detail crop more carefully than a background-heavy lifestyle photo, and judge the result in the storefront rather than only in a desktop preview.
What To Check Before Uploading
Main Product Image
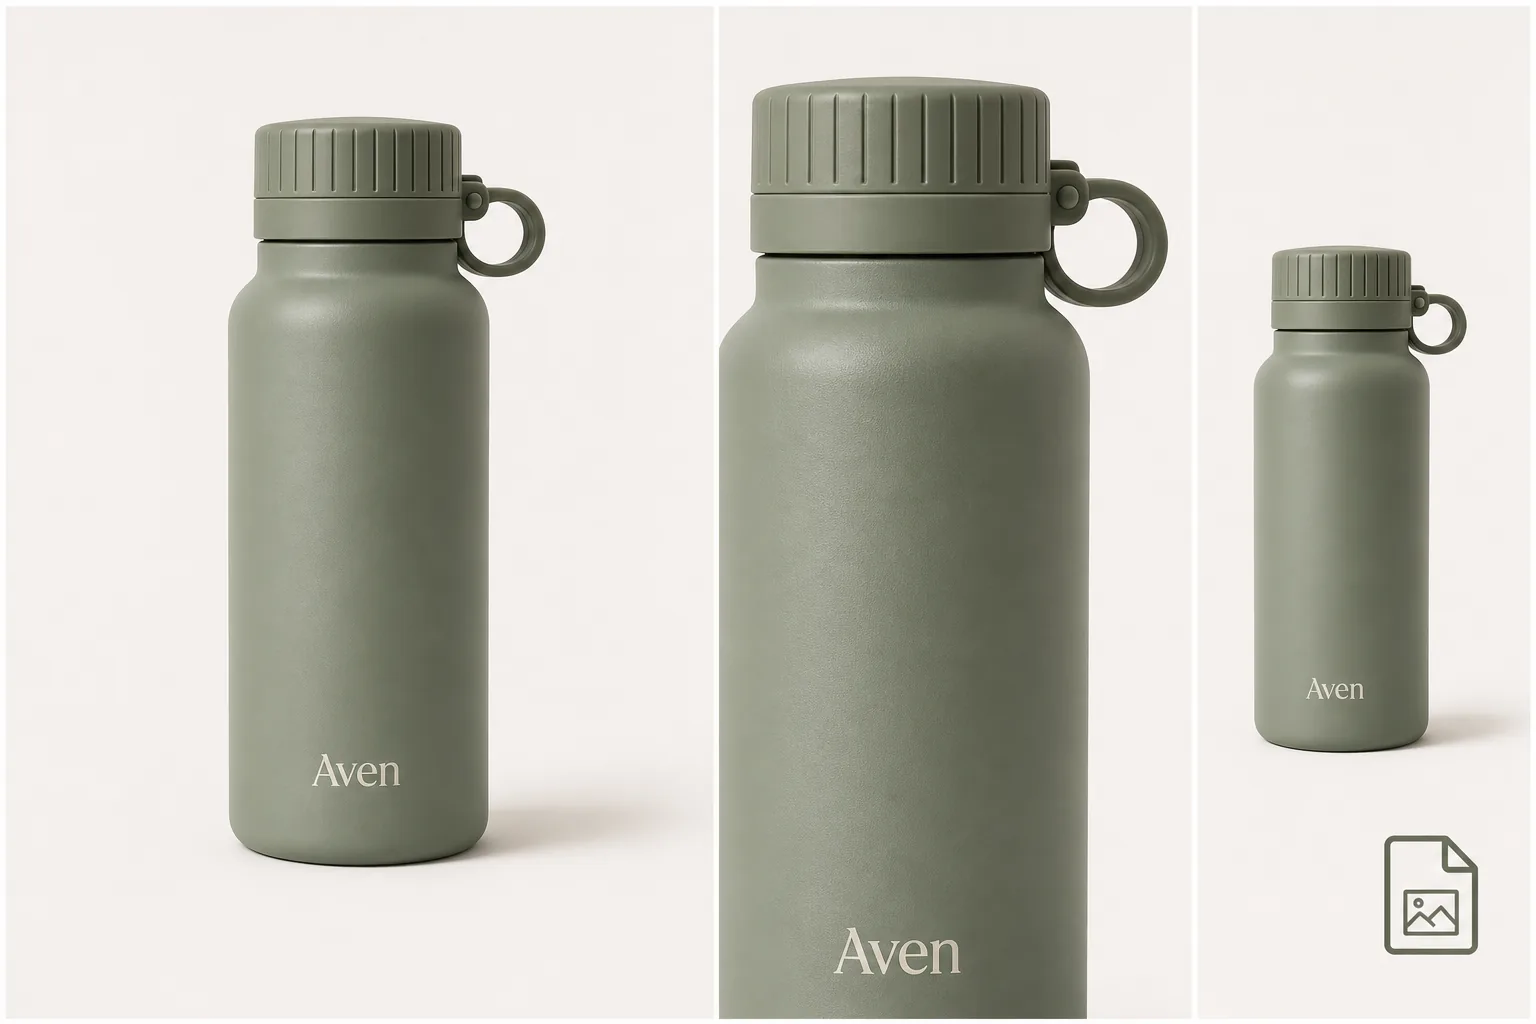
The main product image should still identify the item instantly after compression. Check the outline, color, material finish, and shadow. If the product looks smaller, flatter, or less trustworthy after compression, the export is too aggressive.
For a bottle, inspect the cap edge, label position, handle loop, and base shadow. For apparel, inspect fabric texture, seams, buttons, hem, and color. For jewelry, inspect prongs, stone shape, metal edges, and reflection.
Detail Image
Detail images are usually less forgiving because the whole point is inspection. A compressed detail image should still show why the detail matters: leather grain, fabric weave, ceramic texture, cap threading, zipper hardware, screen ports, or package print.
If the detail crop cannot survive compression, do not solve that only by raising the file size. First check whether the source image is sharp enough. If the original is soft, use an AI image upscaler or reshoot/recreate the detail image before compressing.
Lifestyle Image
Lifestyle images can often tolerate more compression than detail images, but they still need product truth. The background can be softer; the product cannot drift. Check that color, scale, shape, and key features remain clear.
Avoid compressing a lifestyle image so hard that the product blends into props, shadows, or background texture. The scene should support the product, not hide it.
Collection Image
Collection images need fast scanning. Preview the product in the collection grid and mobile layout. If shoppers cannot tell variants apart at thumbnail size, the image has failed even if the file is light.
Keep consistent aspect ratio, product scale, crop, and background treatment across a collection. Consistency often improves perceived speed because shoppers can compare products faster.
Use WebP, But Keep A Product Master
WebP is a practical final format for many storefront images because it can reduce file weight while keeping visible quality. Still, keep a higher-quality product master outside the live upload workflow. The master is your source for future crops, ads, marketplace exports, and detail edits.
A good file setup is:
- master product image for editing and reuse
- web-ready product image for Shopify
- detail crop for zoom or product information
- collection crop for grid consistency
- ad crop when the product needs a campaign layout
KrafLayer can help prepare those image roles before compression. Use the broader Shopify product images workflow for channel planning, the product photo editor for cleanup, and ecommerce product photography for deciding which image roles a product page needs.
Compression Mistakes That Hurt Product Pages
Avoid these mistakes:
- compressing the only master file
- using one export setting for every product category
- judging quality only in a desktop file preview
- ignoring mobile gallery crops
- letting labels, stitching, ports, caps, or material texture blur
- making variant colors harder to compare
- replacing a sharp but large image with a smaller image that changes product truth
- claiming a fixed file-size rule without testing the actual Shopify theme
The goal is not to make every image tiny. The goal is to make the page lighter while the buyer can still inspect the product.
A Product Detail Review Checklist
Before publishing the compressed file, ask:
- Can the buyer still identify the product in under a second?
- Does the compressed image preserve true color?
- Are important labels, seams, texture, caps, ports, or hardware still clear?
- Does the zoom view still help, or does it only show compression artifacts?
- Does the collection thumbnail still distinguish this product from nearby items?
- Does the mobile image crop hide any important feature?
- Does the lifestyle image keep the product more important than the scene?
- Would the same image still be useful for ads or marketplace reuse?
If the answer is no, improve the source image or use a gentler export. Do not let file size erase the evidence that sells the product.
When To Upscale Before Compression
Upscaling can help when the source image is too small or soft before optimization. It should not be used to invent product facts. After upscaling, inspect the same details you would inspect after compression: edges, material texture, printed text, color, hardware, and scale.
Use upscaling when:
- the source photo is smaller than the crop you need
- the detail image looks soft before export
- zoom view exposes weak texture or edge detail
- collection images need consistent scale from mixed sources
Then compress the improved file and review again. Upscaling and compression are opposite steps, but they can work together when the master image is weak and the final storefront image must still be light.
FAQ
What is the best Shopify product image file size?
The best Shopify product image file size is the smallest version that still preserves product detail in your actual theme. Avoid universal byte targets. A main image, detail crop, and lifestyle image can each need different compression because shoppers inspect different information in each one.
Should I compress every Shopify product image the same way?
No. Compress by image role and product category. A simple main image may tolerate stronger compression than a close-up of leather texture, jewelry prongs, product labeling, or fabric weave. Test the image in the product gallery, zoom view, collection grid, and mobile layout.
Is WebP good for Shopify product images?
WebP is often a good final format for web-ready storefront images because it can reduce file weight while preserving visible quality. Keep a higher-quality master file separately so future crops, ads, detail images, and marketplace exports do not depend on an already compressed upload.
How do I reduce product image file size without losing quality?
Start with a clean source image, export a compressed copy, and compare it against the original inside the storefront layout. Check labels, texture, edges, shadows, color, and zoom detail. If the compressed image damages product facts, use a gentler export or improve the source image first.
Can KrafLayer help with Shopify image optimization?
KrafLayer can help prepare the product image before compression: clean the background, improve resolution, fix image issues, or create a clearer product image set. After that, compress the web-ready export and review it in Shopify so speed improvements do not remove selling detail.
Conclusion
Shopify product image file size should be handled as a balance between speed and product evidence. Compress images enough to make the storefront lighter, but protect the details buyers use to trust the product: color, texture, label, edge, scale, and zoom clarity. A stronger source image from KrafLayer gives you more room to optimize without turning the final Shopify image into a blurry compromise.
Related articles
Platforms · 6 min read
Shopify Collection Image Size and Product Grid Image Consistency
A practical Shopify collection image workflow for consistent product grids, safe crops, focal points, and product-detail review.
Platforms · 6 min read
Shopify Product Image Alt Text: How to Write Descriptive Ecommerce Image Copy
A practical guide to writing Shopify product image alt text for main, detail, lifestyle, and variant images without keyword stuffing.
Platforms · 6 min read
Shopify Product Image Optimization for Speed, Zoom, and Conversion
A practical Shopify image workflow for sharp product-page zoom, consistent collection crops, compressed files, and accurate product detail.
Platforms · 5 min read
How to Create Amazon A+ Content Images With AI
A practical workflow for using AI to create Amazon A+ product story, detail, and use-context images without changing the SKU.
Platforms · 5 min read
How to Create Clean White Background Product Images for Google Shopping
A cautious workflow for preparing clean white-background product images for Google Shopping while preserving product truth.
Platforms · 6 min read
How to Fix Google Merchant Center Product Image Disapprovals
A practical, source-checked workflow for fixing Google Merchant Center product image disapprovals without changing the product being sold.
Related KrafLayer tools
- AI product image tools — Browse the full tool list for ecommerce image editing and product visual workflows.
- Ecommerce product photography — Plan listing images, lifestyle scenes, detail shots, and store-ready ecommerce product photos.
- Listing main and detail images — Generate ecommerce listing main images and detail-page product visuals from product references.
- On-model product photos — Create product-on-model and lifestyle visuals when human context helps the product sell.
- Marketplace product images — Choose product image workflows for Shopify, Amazon, Etsy, Walmart, WooCommerce, and other selling channels.
- Product category image styles — Browse category-specific product image pages for beauty, jewelry, fashion, furniture, tech, food, and more.
- Product photo editor — Clean, retouch, upscale, restore, outpaint, and repair product photos before publishing.
- Reference-style product images — Generate ecommerce product images from competitor, brand, or campaign reference styles while preserving your own product identity.
- AI background remover — Create clean transparent product cutouts for listings, ads, and layout work.
- AI object eraser — Remove props, text, clutter, or distractions from product images.
- AI image upscaler — Increase product image resolution for listings, ads, and detail-page assets.
- AI image restoration — Refresh damaged, low-quality, or older product photos before reuse.
- AI background replacer — Move a product into a cleaner studio, lifestyle, or campaign background.
- AI mask edit — Edit selected regions while keeping the rest of the product image stable.
- AI reference image editor — Use extra references to guide product identity, material, style, or composition changes.
- AI scene compose — Place products into controlled commercial scenes without losing product clarity.