Ecommerce
Home / Blog / How to Turn Warehouse Product Photos Into Online Store Images
How to Turn Warehouse Product Photos Into Online Store Images
A practical no-studio workflow for turning rough warehouse product photos into cleaner online store images without changing SKU color, material, shape, or details.
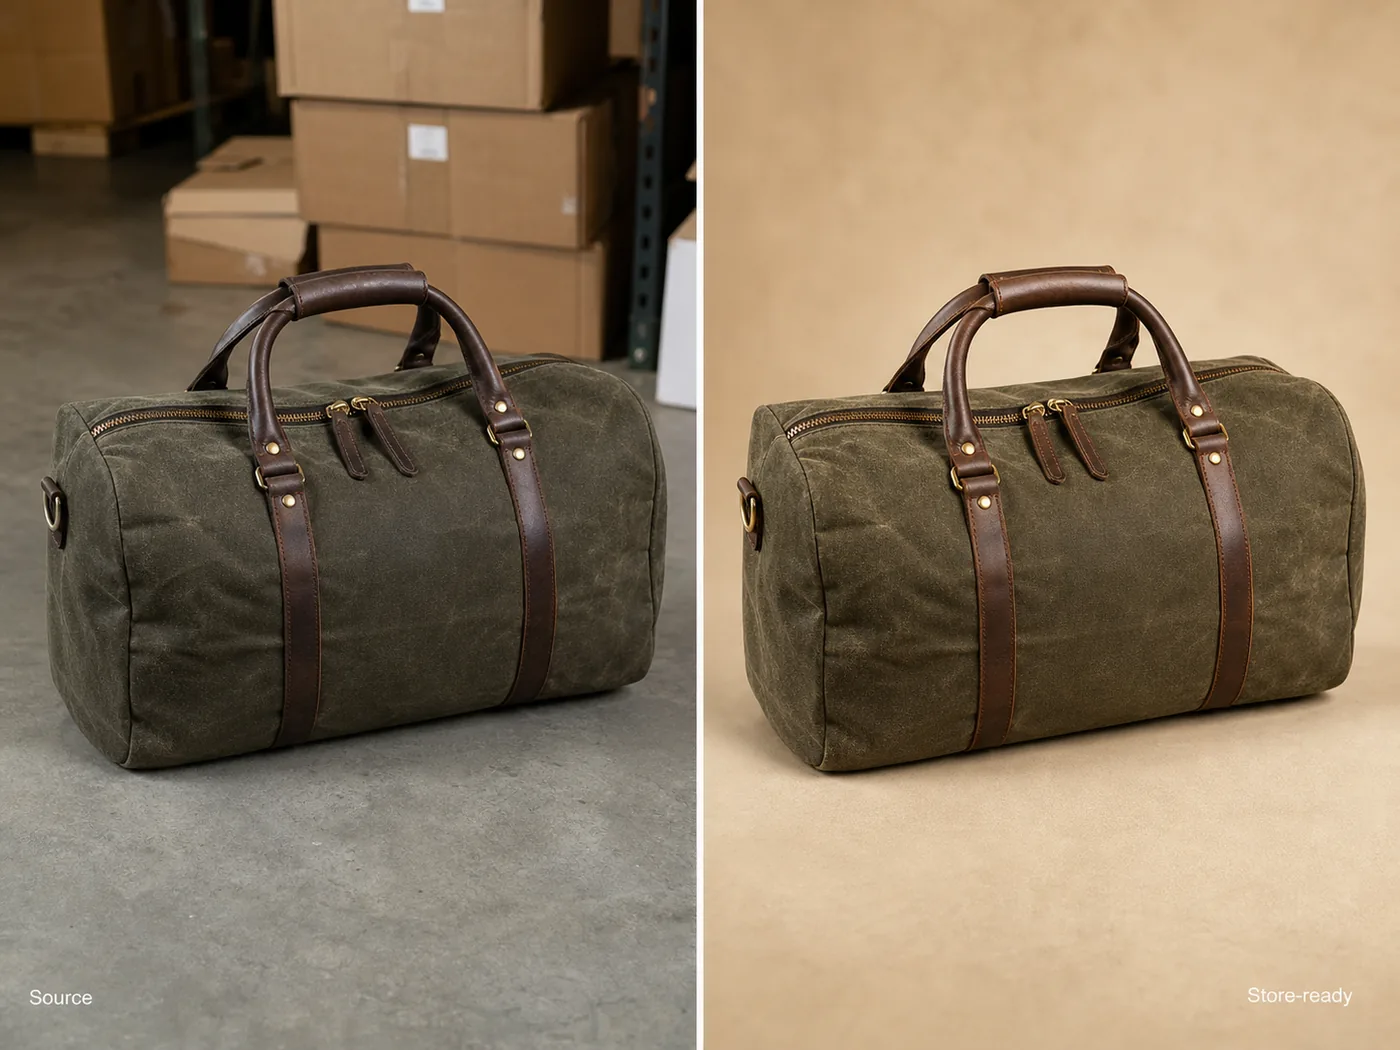
Warehouse product photos can become online store images when you treat them as product evidence, not as finished creative. Keep the real SKU facts from the warehouse shot, then improve the crop, background, lighting, edge clarity, and image role for a product page.
The practical rule is simple: clean the photo without changing what the buyer will receive. For a bag, that means preserving the canvas color, leather handles, zipper shape, stitching, strap position, hardware finish, proportions, and natural shadow while removing the warehouse clutter around it.
KrafLayer fits this workflow when you already have inventory photos and need ecommerce product photography assets faster than a studio reshoot.
Start With The Warehouse Photo That Shows The Most Product Truth
The best source photo is not always the cleanest one. It is the one that shows the product clearly enough for AI and a human reviewer to protect the SKU.
Before you edit or generate anything, pick a warehouse image where the full product outline is visible. Avoid photos where boxes cover the product, straps are hidden, labels are unreadable, or the item is cropped off. If the warehouse shot hides a buyer-relevant detail, take one more quick reference photo before building store assets.
For bags, shoes, apparel, home goods, beauty packaging, and electronics, write down the facts that must not change. This product-truth list is more useful than a long style prompt.
What Makes Warehouse Photos Hard To Publish
Warehouse product photos usually have operational problems: concrete floors, shelf shadows, cardboard boxes, barcode stickers, mixed overhead light, narrow aisles, and rushed framing. Those issues make the product feel less trustworthy even when the SKU is good.
Fix the image in this order:
1. Straighten and crop the product so the main shape reads immediately. 2. Remove visual clutter that is not part of the product. 3. Correct color cast without over-whitening the material. 4. Replace or clean the background based on the image role. 5. Restore texture, stitching, hardware, label, or edge detail. 6. Keep a realistic contact shadow so the product does not float. 7. Compare the result against the original warehouse reference.
Do not start by asking for a premium lifestyle scene. If the product facts are unstable, a nicer background just makes the mistake harder to notice.
Main Image, Detail Image, Or Store Banner?
Decide the image role before using AI. A warehouse reference can support several store assets, but each role needs different restraint.
A main image should make the product easy to inspect. Use a clean white, off-white, light gray, or quiet neutral background, depending on the channel. The product should be large enough to understand on mobile.
A detail image should answer one buyer question. For a duffel bag, that might be canvas texture, zipper construction, handle material, lining, strap connection, or bottom reinforcement. Do not use a detail image as a second generic hero.
A store banner or campaign image can add context, but only after the main product image is accurate. If the bag becomes a different size, color, or shape in the banner, the creative is not useful.
For this reason, ecommerce product photography is less about making a warehouse item look expensive and more about making the product understandable, accurate, and ready for a buying decision.
KrafLayer Workflow For Warehouse Photos
Use the warehouse photo as a reference and work one output at a time.
First, create a clean main image. In KrafLayer, use the warehouse shot as the product reference, then ask for a simple online-store product image. Protect the exact SKU facts: shape, dimensions, color, material texture, seams, hardware, labels, and shadow logic.
Next, use the product photo editor for smaller repairs. Remove warehouse floor marks, table edges, dust, temporary stickers, or background objects only when they are not part of the product being sold. If the product is already accurate and you only need a transparent cutout, the AI background remover is the better workflow.
Finally, generate supporting images only after the main image passes review. A detail image, secondary angle, or simple lifestyle scene should build on the same product truth instead of inventing a cleaner-looking but different item.
Prompt Pattern For Store-Ready Images
Use a prompt that separates protected product facts from improvements.
Turn this warehouse product photo of an olive waxed-canvas duffel bag into a clean online store product image. Preserve the exact bag shape, olive canvas color, fabric texture, leather handle placement, brass zipper, strap position, stitching, seams, proportions, and natural shadow. Improve the crop, straighten the product, remove warehouse clutter, use a clean warm neutral ecommerce background, balance the lighting, and make the material detail clear. Do not redesign the bag, change the color, add logos, add badges, add barcodes, invent labels, remove real hardware, or make it look like a different SKU.
For another product category, replace the protected facts with the details that matter there. For electronics, protect ports, buttons, vents, screen shape, finish, and scale. For skincare, protect bottle geometry, cap, pump, label area, fill color, and material. For apparel, protect fabric, seams, collar, cuffs, hem, buttons, fit cues, and color.
What To Review Before Uploading
Review the final image like a merchant, not like a designer.
Check these questions:
- Is this still the same SKU from the warehouse photo?
- Did the real color family stay intact?
- Are material texture, stitching, hardware, labels, ports, seams, and edges plausible?
- Did the AI remove only warehouse artifacts, not product features?
- Is the product large enough to inspect on a phone?
- Does the background support the image role?
- Are there fake logos, badges, barcodes, QR codes, claims, marketplace marks, or impossible details?
- Would the buyer feel misled when the package arrives?
If the answer is uncertain, make a smaller edit instead of publishing the image. Good AI-assisted product photography should reduce friction for the buyer, not hide uncertainty from the seller.
A Simple Batch Process For Small Catalogs
Warehouse-to-store workflows are most useful when they become repeatable.
Use the same sequence for every SKU:
1. Capture or select the clearest warehouse reference. 2. Write a short product-truth list. 3. Generate or edit one clean main image. 4. Create one detail image only when it adds selling information. 5. Review against the source photo. 6. Export the final store crops. 7. Save the product-truth list for future variants or campaign images.
This keeps the catalog consistent without making every product look like it came from the same generic template.
FAQ
Can warehouse product photos be used for ecommerce?
Yes. Warehouse product photos can become ecommerce images if the product is visible enough to serve as a reliable reference. The final image should clean up crop, background, lighting, and clutter while preserving the real SKU color, shape, material, hardware, label area, and buyer-relevant details.
What is the fastest way to turn warehouse product photos into online store images?
Start with the clearest inventory photo, list the product facts that must stay unchanged, then create one clean main image before making detail or lifestyle images. Use editing for small fixes and background cleanup; use generation when you need a new store-ready image role from the same product reference.
Should I remove all warehouse context from product photos?
For main images, usually yes: remove warehouse clutter so the buyer can inspect the product. For detail or behind-the-scenes content, some context can be useful, but it should not distract from the product or make the SKU harder to understand.
Can AI change the product by accident?
Yes. AI can quietly change color, stitching, handles, ports, labels, seams, scale, and hardware. That is why every workflow should start with a product-truth list and end with a side-by-side review against the warehouse reference.
When should I reshoot instead of using AI?
Reshoot when the warehouse photo hides important product details, has severe blur, crops off the item, or shows color so poorly that the real product cannot be judged. AI works best when the source photo already contains enough truthful information to protect the SKU.
Conclusion
Turning warehouse product photos into online store images is a practical way to move inventory online without waiting for a full studio shoot. The safest workflow is reference-first: choose a clear warehouse image, protect the SKU facts, clean the background and lighting, then review the final image before publishing. KrafLayer helps sellers turn rough inventory references into cleaner ecommerce main images, detail images, and store assets while keeping product identity at the center.
Related articles
Ecommerce · 6 min read
How to Create Perfume Product Photos Without a Studio
A practical workflow for creating perfume main images and detail images without a studio while preserving glass, liquid, cap, label, and reflection details.
Ecommerce · 6 min read
How to Turn Phone Product Photos Into Ecommerce Images
A no-studio workflow for turning ordinary phone product photos into cleaner ecommerce images while keeping product color, fabric, shape, and buyer-facing details accurate.
Ecommerce · 7 min read
Common Background Colors for Ecommerce Product Photography
A practical guide to white, gray, warm neutral, muted brand, and dark background colors for ecommerce product photography.
Ecommerce · 8 min read
Ecommerce Product Photography Trends 2026: What Online Stores Actually Need
The 2026 ecommerce product photography trend is not louder imagery. Stores need clearer product identity, faster content production, and image systems that work across listings, PDPs, ads, and marketplace channels.
Ecommerce · 7 min read
White Background vs Lifestyle Background for Product Photos
A practical guide to choosing white-background product photos for clarity and lifestyle backgrounds for ecommerce context.
Ecommerce · 7 min read
How to Create Ecommerce Product Photos Without a Studio
A practical no-studio workflow for turning one product reference into main images, detail images, lifestyle scenes, and ad creatives.
Related KrafLayer tools
- AI product image tools — Browse the full tool list for ecommerce image editing and product visual workflows.
- Ecommerce product photography — Plan listing images, lifestyle scenes, detail shots, and store-ready ecommerce product photos.
- Listing main and detail images — Generate ecommerce listing main images and detail-page product visuals from product references.
- On-model product photos — Create product-on-model and lifestyle visuals when human context helps the product sell.
- Marketplace product images — Choose product image workflows for Shopify, Amazon, Etsy, Walmart, WooCommerce, and other selling channels.
- Product category image styles — Browse category-specific product image pages for beauty, jewelry, fashion, furniture, tech, food, and more.
- Product photo editor — Clean, retouch, upscale, restore, outpaint, and repair product photos before publishing.
- Reference-style product images — Generate ecommerce product images from competitor, brand, or campaign reference styles while preserving your own product identity.
- AI background remover — Create clean transparent product cutouts for listings, ads, and layout work.
- AI object eraser — Remove props, text, clutter, or distractions from product images.
- AI image upscaler — Increase product image resolution for listings, ads, and detail-page assets.
- AI image restoration — Refresh damaged, low-quality, or older product photos before reuse.
- AI background replacer — Move a product into a cleaner studio, lifestyle, or campaign background.
- AI mask edit — Edit selected regions while keeping the rest of the product image stable.
- AI reference image editor — Use extra references to guide product identity, material, style, or composition changes.
- AI scene compose — Place products into controlled commercial scenes without losing product clarity.