Edit tools
How to Remove Reflective Stickers from Product Main Images
TL;DR
A practical AI retouching workflow for removing barcode, price, and inventory stickers from product main images without changing the real SKU. Includes how to do it in KrafLayer.
TL;DR
For Remove Reflective Stickers from Product Main Images, KrafLayer works best as a local cleanup tool: brush only the unwanted area in Erase and let the model fill from the surrounding pixels. Avoid regenerating the whole image; the result is only useful if shape, material, labels, color, scale, and accessories still match the source SKU.
If a product main image has a shiny price sticker, barcode label, or warehouse tag on the front, remove the sticker before publishing the listing. The goal is not to make a new product photo. The goal is to restore the real product surface, keep the exact SKU, and remove the glare that pulls buyers away from the item.
KrafLayer is an AI-powered visual editor for ecommerce product photography. For this job, use it as a narrow local retouching pass: erase the reflective sticker, rebuild only the covered surface, and keep the product's shape, material, light, scale, and shadow unchanged.
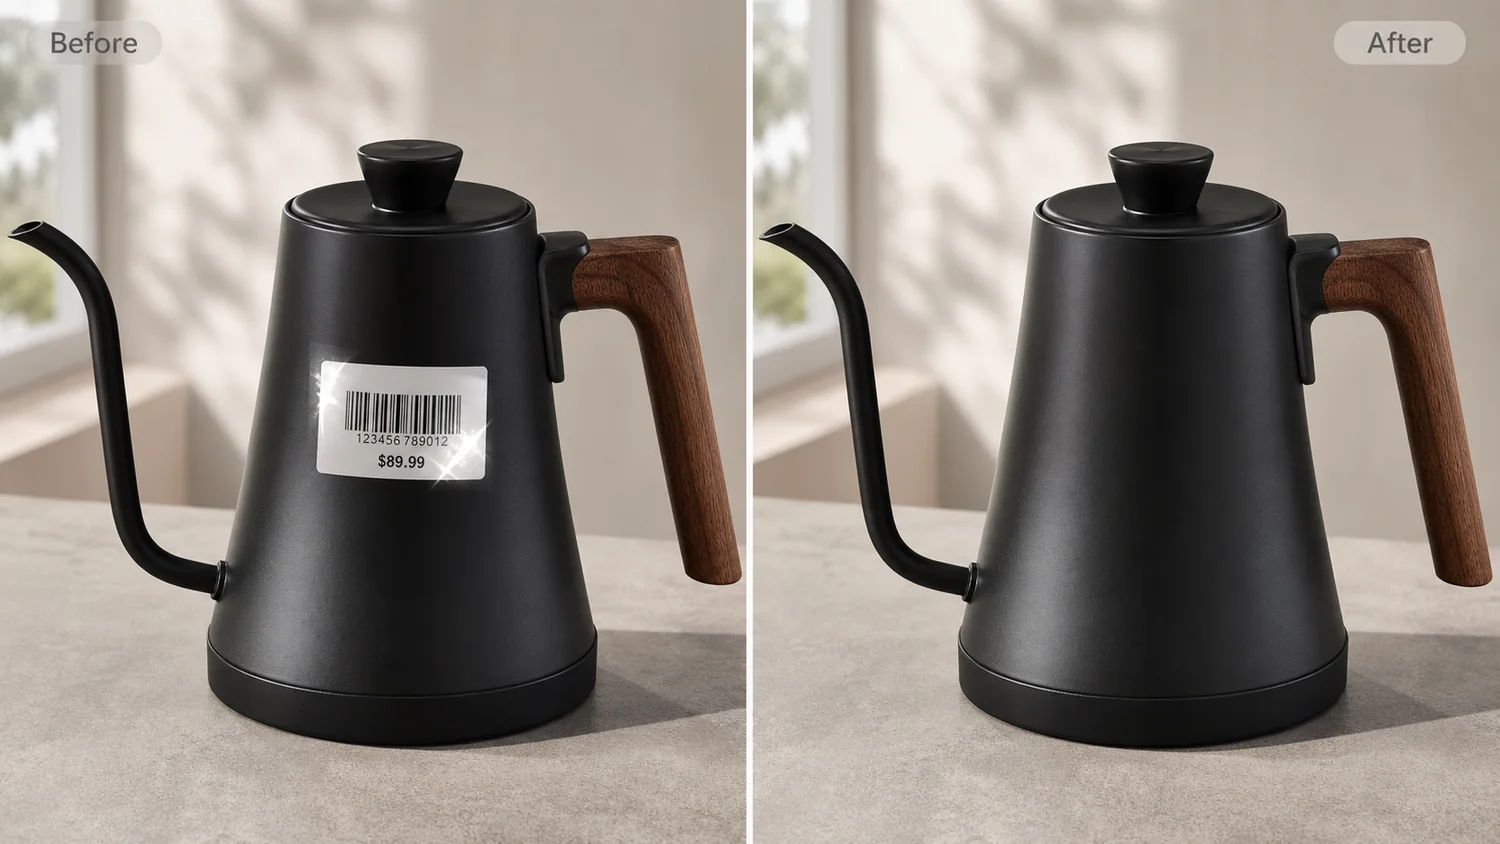
The example uses one matte black gooseneck kettle with a walnut handle. The before image has a reflective barcode and price sticker on the body. The after image keeps the same spout, lid, handle, black matte texture, camera angle, tabletop, and contact shadow, but the front surface is clean enough for a marketplace main image.
Why Reflective Stickers Hurt Main Images
A sticker on a product photo creates three listing problems at once. It hides the material, introduces glare, and makes the image feel like a stockroom snapshot rather than a product asset. On dark metal, glass, plastic, and glossy packaging, the reflection can become brighter than the product itself.
For ecommerce, the main image has one job: make the product readable in a small thumbnail. A barcode label, price tag, or quality-control sticker competes with the product shape and can make the buyer wonder whether the item is used, discounted, or unfinished.
What to Protect Before Editing
Treat the sticker as the only edit target. Do not ask AI to improve the whole photo at the same time, because broad prompts can quietly redesign the product.
Protect these details:
- product silhouette and camera angle
- handle, spout, lid, strap, cap, or hardware geometry
- material texture under the sticker
- true color and finish
- light direction and highlight strength
- scale, crop, and centered position
- natural contact shadow
The after image should look like the same photo after the sticker was peeled off cleanly.
Edit Prompt for Sticker and Glare Removal
Use a narrow edit prompt in [KrafLayer](https://kraflayer.com):
Remove the reflective barcode sticker, price label, adhesive mark, and sticker glare from the front of this product main image. Rebuild only the covered product surface so it matches the surrounding material. Keep the exact same product shape, spout, lid, handle, matte finish, color, camera angle, crop, scale, lighting, tabletop, and soft contact shadow. Do not change the product design, add a logo, add text, add props, change the background, or make the surface look plastic.
If the product has packaging text, regulated labels, serial numbers, or safety marks that must stay visible, do not remove them. This workflow is for shoot-side stickers, warehouse labels, temporary price tags, and glare that should not be part of the selling image.
QA the Retouched Surface
Zoom in before approving the edit. A sticker removal can fail in subtle ways: a warped reflection, a smeared texture, a dent where the sticker was, or a surface that suddenly looks too smooth.
Check that:
- the material grain or matte finish continues through the repaired area
- no ghost outline of the sticker remains
- glare no longer dominates the thumbnail
- the product edge and proportions did not change
- the light still matches the rest of the image
- the image still works as a main image, not just a retouched close-up
A good result should feel boring in the right way. The buyer notices the kettle, not the cleanup.
When to Reshoot Instead
Do not use AI cleanup to hide real product condition issues. If the sticker damaged the surface, covers a required product label, or changes buyer-relevant information, reshoot or show the product honestly. AI retouching is best for temporary shoot artifacts that should never have been in the main image.
For catalog work, save the cleaned WebP for the listing and keep the original source file in your archive. If a marketplace or buyer asks about the image, you can still trace what was edited.
Where KrafLayer Fits
When you apply this Remove Reflective Stickers from Product Main Images workflow in KrafLayer, the tool choice matters: brush only the unwanted area in Erase and let the model fill from the surrounding pixels. After generation, judge the image by the channel it serves — listing images, detail pages, or ad assets — and check that shape, material, labels, color, scale, and accessories still match the source SKU.
FAQ
How do I remove reflective stickers from product main images?
Use a local AI edit that removes only the temporary sticker and glare while preserving the product shape, material texture, lighting, crop, scale, and natural shadow.
Can AI remove a barcode sticker without changing the product?
Yes, if the prompt protects the SKU details and limits the edit to the sticker area. Always compare the repaired surface against nearby material before approving it.
Should I remove every label from a product photo?
No. Remove temporary shoot-side stickers, price tags, and warehouse labels only. Keep real product labels, required marks, and buyer-relevant information.
What makes the after image listing-ready?
The product should be readable first, the repaired surface should match the original material, and no sticker glare or ghost outline should distract from the SKU.
Related articles
Edit tools · 6 min read
Product Photo Background Replacement for Ecommerce Scenes and Ads
Learn how to replace product photo backgrounds for ecommerce scenes and ads while preserving scale, material, light, and product truth.
Edit tools · 5 min read
Replace Product Backgrounds With AI Without Making Products Look Fake
Learn how to replace a product background with AI while keeping lighting, scale, shadow, and product details believable.
Edit tools · 5 min read
Transparent Product Image PNG: When Ecommerce Sellers Need Cutouts
Learn when ecommerce sellers need transparent product PNG cutouts, how to create them with AI background removal, and what to check before reuse.
Edit tools · 5 min read
How to Remove Backgrounds From Product Images Without Manual Masking
Remove backgrounds from product images with a one-click AI workflow, then review edges, cutouts, white backgrounds, and channel-ready reuse.
Edit tools · 5 min read
Product Image Background Remover for Listings, Stores, and Ads
Use a product image background remover to create transparent cutouts, white-background listing images, store assets, and ad crops without changing the SKU.
Edit tools · 5 min read
Remove Background From a Product Photo: AI Workflow and Quality Checks
Remove a background from one product photo, then check edge quality, material detail, shadow, and channel readiness before publishing.
Related KrafLayer tools
- AI product image tools — Browse the full tool list for ecommerce image editing and product visual workflows.
- Ecommerce product photography — Plan listing images, lifestyle scenes, detail shots, and store-ready ecommerce product photos.
- Listing main and detail images — Generate ecommerce listing main images and detail-page product visuals from product references.
- On-model product photos — Create product-on-model and lifestyle visuals when human context helps the product sell.
- Marketplace product images — Choose product image workflows for Shopify, Amazon, Etsy, Walmart, WooCommerce, and other selling channels.
- Product category image styles — Browse category-specific product image pages for beauty, jewelry, fashion, furniture, tech, food, and more.
- Product photo editor — Clean, retouch, upscale, restore, outpaint, and repair product photos before publishing.
- Reference-style product images — Generate ecommerce product images from competitor, brand, or campaign reference styles while preserving your own product identity.
- AI background remover — Create clean transparent product cutouts for listings, ads, and layout work.
- AI object eraser — Remove props, text, clutter, or distractions from product images.
- AI image upscaler — Increase product image resolution for listings, ads, and detail-page assets.
- AI image restoration — Refresh damaged, low-quality, or older product photos before reuse.
- AI background replacer — Move a product into a cleaner studio, lifestyle, or campaign background.
- AI mask edit — Edit selected regions while keeping the rest of the product image stable.
- AI reference image editor — Use extra references to guide product identity, material, style, or composition changes.
- AI scene compose — Place products into controlled commercial scenes without losing product clarity.