Edit tools
Smooth Clothing Wrinkles in Product Photos With AI
TL;DR
Smooth temporary clothing wrinkles with AI while preserving pleats, seams, fabric texture, garment shape, and truthful condition evidence.
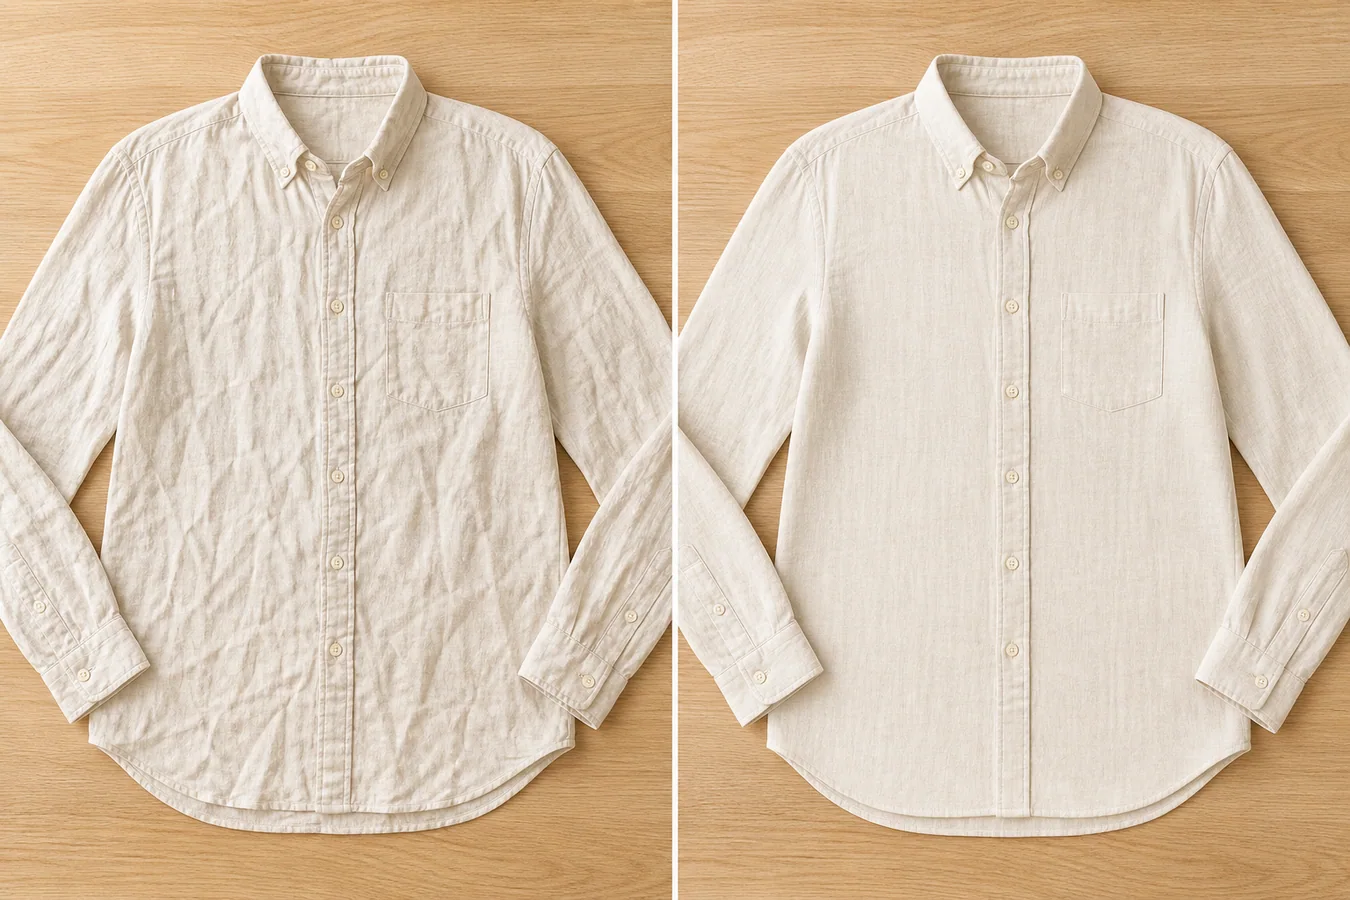
AI can smooth temporary wrinkles in clothing product photos, but the safest edit is local and conservative. Remove storage creases without changing the garment's construction, texture, shape, color, or condition.
TL;DR
For Smooth Wrinkles in Clothing Product Photos, use KrafLayer for controlled local changes or reference-guided edits. Use Mask Edit for a local change with a short instruction, or Reference Image Editor when the result needs a visual example. The finished image should still prove that fit, fabric, shoulder line, garment length, and real color are still intact.
To smooth wrinkles in a clothing product photo, do not ask AI to make the garment perfect. Ask it to make the image sellable while keeping the real shirt, dress, jacket, or knitwear recognizable. The buyer still needs to read the fabric, cut, seams, buttons, and drape.
KrafLayer is an AI-powered visual editor for ecommerce product photography. For apparel wrinkle cleanup, use it as a controlled retouching tool: reduce distracting creases, protect the garment facts, and keep enough fabric texture so the result does not look plastic.
The example uses one cream linen button-up shirt. The before side has deep wrinkles across the torso and sleeves. The after side is smoother and more listing-ready, but the collar, placket, buttons, pocket, cuffs, hem curve, linen weave, and flat-lay angle stay consistent.
Why Wrinkles Are Different From Dirt
Wrinkles are part of fabric, so removing every line can make apparel look fake. A good edit removes the creases that distract from the product while leaving small weave texture, soft folds, and natural shadows. That balance matters for linen, cotton, silk, wool, denim, and knits.
For ecommerce, the goal is not a showroom fantasy. The goal is a clean product image that helps a buyer judge fit, material, and finish without wondering whether the seller changed the garment.
Start by Protecting the Garment Facts
Before editing, name the details that must stay fixed:
- collar shape and neckline
- button count and button spacing
- pocket position
- sleeve length and cuff construction
- seam paths and placket width
- hem curve, drape, and crop
- fabric weave, color, and thickness
If the AI smooths the shirt but moves the pocket, changes the collar, loses the linen texture, or invents new buttons, reject the output. A cleaner photo is not useful when it quietly changes the SKU.
A Prompt for Apparel Wrinkle Cleanup
Use a narrow prompt in [KrafLayer](https://kraflayer.com):
Smooth the distracting wrinkles in this clothing product photo for an ecommerce listing. Keep the same garment, angle, crop, color, fabric weave, seams, collar, buttons, pocket, cuffs, hem, scale, and natural shadow. Preserve realistic linen texture and soft fabric depth. Do not redesign the shirt, change the fit, remove construction details, add a model, add props, or make the fabric look plastic.
This keeps the edit focused. You are not asking for a new fashion campaign image. You are asking for a better version of the same product photo.
Review the Result Like a Seller
Zoom in before using the image. Check the places where AI often over-cleans apparel:
- the placket should still line up
- buttons should stay round and evenly spaced
- seams should not melt into the fabric
- cuffs should keep their stitching and shape
- the weave should remain visible
- the garment should still show light fabric depth, not a flat painted surface
For a main image, the shirt can be cleaner. For a detail image, leave more texture so buyers can trust the material.
When to Use This Workflow
Use AI wrinkle smoothing when the product is correct but the shoot was rushed. It is useful for supplier photos, flat-lay apparel, thrift or resale listings, small boutique uploads, and catalog refreshes where a full reshoot is not realistic.
Do not use it to hide product damage, shrink a garment, fake a different cut, or make used clothing look new if the condition should be disclosed. The edit should improve presentation, not misrepresent the item.
Where KrafLayer Fits
When you apply this Smooth Wrinkles in Clothing Product Photos workflow in KrafLayer, the tool choice matters: use Mask Edit for a local change with a short instruction, or Reference Image Editor when the result needs a visual example. After generation, judge the image by the channel it serves, listing images, detail pages, or ad assets, and check that fit, fabric, shoulder line, garment length, and real color are still intact.
Which wrinkles should you remove?
Google's virtual try-on guidance says flat-lay garments should avoid excessive folds or wrinkles, but that is not permission to erase construction. Remove temporary compression creases, hanger dents, and small storage folds. Preserve pleats, gathers, darts, puckering that reveals seam construction, and the natural drape of the fabric ([Google virtual try-on](https://support.google.com/merchants/answer/16159685?hl=en-GB), 2026).
Use this classification before editing:
| Mark in the fabric | Usually edit? | Reason |
|---|---|---|
| Shipping fold across a flat panel | Yes, lightly | Temporary and not part of the design |
| Designed pleat or gather | No | Product construction |
| Hanger bump at shoulder | Yes | Styling artifact |
| Seam puckering | Usually no | May describe real manufacturing quality |
| Natural linen variation | No | Material identity |
| Deep crease hiding a print | Edit or reshoot | Buyer cannot inspect the actual graphic |
If you cannot tell whether a line is a wrinkle or construction, compare the same area in another source view. When evidence is missing, reshoot instead of smoothing the uncertainty away.
Use a local mask, not a full garment regeneration
The safest KrafLayer route is Mask Edit: paint only the temporary wrinkle and give a plain instruction for the masked area. Keep the mask inside one fabric panel and away from seams, hems, buttons, prints, and silhouette edges.
Example instruction:
```text Reduce only the temporary diagonal storage crease inside the masked cotton panel. Preserve the original weave, shade, print, seam, hem, stitching, drape, lighting, and garment shape. Do not smooth outside the mask or redesign the fabric. ```
Work in several small passes. One mask over the entire garment gives the model too much freedom and can change fit, pocket position, or fabric texture. Compare each pass with the untouched source before moving to the next area.
Review texture at three zoom levels
Google asks merchants to show the correct color, pattern, and material. Wrinkle cleanup can pass at thumbnail size while failing at full resolution because the fabric becomes waxy or the weave repeats unnaturally ([Google product image requirements](https://support.google.com/merchants/answer/6324350?hl=en), 2026).
Review at:
1. Thumbnail size: check silhouette and whether the garment reads cleanly. 2. Normal product-page size: check drape, panel transitions, and lighting continuity. 3. 100% zoom: check weave, print, stitching, mask boundary, and repeated texture.
Reject the edit when the cleaned patch is smoother than the rest of the garment, shadows disappear around a seam, a print bends differently, or the color shifts inside the mask.
Test difficult areas separately
Wrinkle removal becomes riskier near construction details. Divide the garment into zones and use a stricter review for each one:
- Collars and lapels: preserve roll, edge thickness, buttonholes, and the shadow where layers overlap.
- Cuffs and hems: keep stitching parallel and retain the real thickness of the folded edge.
- Printed panels: compare letter shapes, line spacing, and print alignment with the source.
- Knits and ribbing: keep the direction and spacing of loops. A soft blur is not repaired knit texture.
- Sheer fabric: preserve the visible relationship between fabric, skin, lining, and background.
- Dark garments: lift exposure temporarily during review so lost seams and plastic-looking patches become visible.
If hair, a hand, a belt, or another garment crosses the edit area, protect that object with a negative mask. Generate one version with the smallest possible edit before attempting a broader cleanup.
Keep an untouched comparison file
Save the original and edited image at the same pixel dimensions. Review them with a difference mindset, not only a beauty mindset. Ask what changed outside the intended crease, whether the silhouette moved, and whether the cleaned area now has less information than the surrounding fabric.
A practical file set is:
1. the untouched camera export; 2. a color-corrected source with no generative edits; 3. the masked wrinkle-cleanup version; 4. the approved ecommerce export; 5. a small review note naming each corrected area.
This makes later variant and campaign work safer. If a new crop reveals an artifact, the team can return to the verified source instead of editing an already edited JPEG.
Use a simple acceptance checklist
Approve the image only when every answer is yes:
- Is the garment silhouette unchanged?
- Are seams, hems, pleats, pockets, fasteners, and prints in the same positions?
- Does fabric texture continue naturally through the cleaned patch?
- Are highlights and shadows consistent with the original light?
- Is the product color unchanged outside intentional color correction?
- Would the image still describe the same condition if this is a resale item?
When one answer is no, reduce the mask or return to physical preparation and a new photograph. A small honest crease is better than a large invented surface.
When should you steam or reshoot instead?
Use a new photo when wrinkles cover most of the garment, the source is blurred, the fabric texture is already lost, or the fold hides construction the buyer needs to inspect. Physical preparation is often faster than repairing twenty large creases one by one.
For resale items, do not remove permanent wear, stretching, damage, stains, or flaws that describe condition. A cleaner composition is useful. A falsely new-looking item is misleading.
FAQ
Can AI remove wrinkles from clothing product photos?
Yes. AI can reduce distracting wrinkles in apparel photos, but the prompt should protect the garment shape, seams, buttons, fabric texture, color, and natural shadow.
Should clothing product photos have no wrinkles at all?
No. Some fabric texture and soft folds should remain, especially for linen, cotton, wool, denim, and knits. Completely flat fabric can look fake.
Is wrinkle smoothing safe for resale clothing photos?
It is safe when the edit improves presentation without hiding condition issues. Do not use wrinkle cleanup to conceal damage, heavy wear, stains, or fit problems that buyers need to know.
Conclusion
Good wrinkle cleanup makes the garment easier to evaluate without making it less truthful. Use a local mask, preserve construction and material behavior, review at three zoom levels, and reshoot when the source cannot support a credible edit. KrafLayer can speed up that controlled cleanup, but the photographed garment remains the source of truth.
Keep exploring
Continue the story
More practical guidance on product accuracy, composition, and conversion-ready visuals.
Put it into practice
Take the next step in KrafLayer
Choose a generation or editing workflow that matches what you just learned.